Friday, June 8, 2018

Electric and Water in a Vintage Camper

Hello!

This week's post is for all those people out there with a vintage camper, thinking of getting one or just curious how we deal with two of the main concerns/components of a vintage travel trailer: electricity and water.

When we got Myrtle, the water had already been removed (apart from the toilet...I guess. The previous owners said they had used it, but we never even tried that out.) The electrical was the original 1963 electrical and hook-ups and according to the previous owner "We didn't get it checked out, but it seemed to work fine."

Hmm. Does that make anyone else feel a bit uncomfortable? The walls had been recently replaced (including all the supporting wood) and the exterior resealed. So, the last thing I wanted to do was dig into the walls and replace electrical. Also, I know nothing about electrical. This would have been a project heavily supervised by my more handy relatives.

So, what to do? We did use the original wiring for 1 camping trip for a light. However, the previous owner had hardwired a window A/C unit in, and I can not imagine that the wiring system was designed to take on that kind of load.

After a couple of camping trips, I decided it was time to figure out a solution. The number one thing recommended to us as we started renovating our home was to wait renovate until we had lived in it for a few years. Its an excellent way to figure out exactly what your family wants and needs.

We do not use a refrigerator while camping. Our trips are just a couple of days, so a heavy duty cooler does the trick. (FYI: We also have a separate one for drinks which really helps keep the ice in the food cooler) We discovered through a couple of camping trips we only need electricity for: (1) lighting in the camper, (2) charging our phones occasionally, (3) a small single serving coffee maker,  and (4) *maybe* the A/C. However, to be honest if it's hot enough to use the A/C we generally aren't going to be camping with young kids.

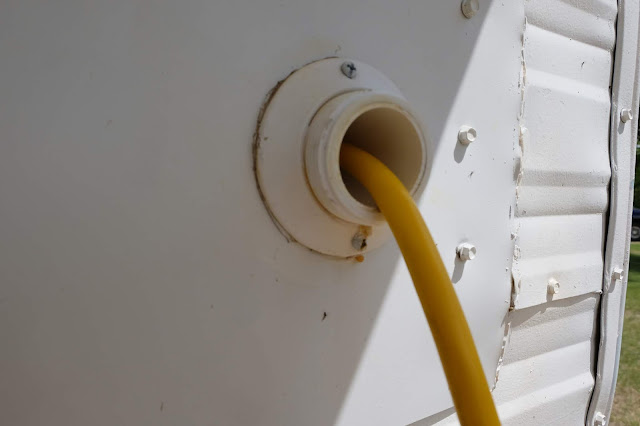
Once we knew what we needed to the electricity for, it was pretty clear an extension cord would be enough power. (With a separate A/C power cord if we were going to run that). I created a solution from a problem. What I mean is, the previous owners took out all the original windows. (I have recently acquired some "new" original ones that will slowly make their way back into the camper). On the front windows they just covered up the area with insulation and sheet metal. While that's less than ideal aesthetic wise, it does make it much easier to create some sort of pass though for an electrical cord.

Using PVC pipe, a hole cutting drill bit, screws, butyl tape and glue, I created a way to pass through the extension cord into the camper without having to prop and window or door open. I have a threaded cap that goes over the opening when we're not camping or using it so there's no issues with bugs or mice getting in.


I hide a power strip and all the cords in a vintage luggage case when not in use. Also, in order to create a "switch" for the lights, I used a simple remote outlet on the overhead lights. The remote is attached to the wall with a command strip.


The second issue is water. We buy our drinking water in separate gallon jugs (and keep in the drinks cooler), but we still need water to clean dishes, wash hands and brush teeth. Our solution for this problem was the original sink (which will get a paint job in the future) with a bucket underneath and a 5 gallon water tank over the sink. I made a stand for the tank so it could hang over the middle of the sink.


We use biodegradable soap while camping so the waste water won't hurt the environment. The only complaint I have with this system is that it's a bit hard to wash large dishes in the small sink. I wish we had a tank that was less deep and was taller. (So, I'm on the hunt for one that fits that criteria). The 5 gallons lasts our family two full days with a bit left over.

It's not luxurious per se, but we're people that really just wanted something that was one step up from tent camping with a bit of style. I think Myrtle perfectly fits the bill. (And no grey water tanks to deal with!)


watermelon pinterest seagreen facebook blue twitter 1
Share:

Friday, April 6, 2018

DIY Dog Water & Food Dish Stand

Hello!

Since my last post was for the cat people, I decided it was time to share one for the dogs.

Something we have discovered with four dogs (!) is that we need large dog dishes for water and food. Otherwise we find ourselves refilling them every couple of hours. Nobody got time for that! We also found out early on that they like to dump their water dish all over the floor. Which is especially problematic with a little one that thinks it's really cool to spread wet foot prints throughout the house. (Okay...they are really cute wet foot prints) A stand/holder for the dishes is a must.

However, they don't make stands for large dishes. About 10 years ago, my husband made a stand for our large dishes, but that was starting to look pretty darn rough. It was time for an update. I decided I wanted something that was open on the bottom so we could clean up any water drips. I also wanted something that looked nice. It was a pretty easy process to make this stand, so read on, grab a couple of supplies and get it done!


Supplies
Piece of plywood (Long and wide enough for both dishes to fit. Most home improvement stores have pre-cut wood so you don't have to buy a large piece of wood if transportation or cutting is an issue)

Table saw/circular saw (to cut the wood to length as needed)

Jig Saw (A jig saw with the ability to do some scroll sawing is helpful because you can adjust your angle as you go along)

Drill & Drill Bit (The big should be big enough that the jig saw blade can fit through the hole)

Sandpaper

Table Legs

Stain or Paint

Sealing Layer (Polyurethane)

Dog Food/Water Dishes

Directions

1. Cut Wood to Length

The first thing was getting the piece of wood a correct length. You will want a couple of inches around the dishes so you don't compromise the wood as you cut the circles.

2. Trace and Cut Circles

Once you have the wood cut to the correct length, you will need to flip the dishes over to trace around the lip of the dishes. Once you have traced around the dishes, you will need to account for the lip. Make a second circle within the larger circle to make a smaller hole so the dish will be held up. Erase the larger circle to avoid confusion.

To cut the circles, first drill a hole on the smaller circle towards the inside. This hole needs to be big enough that a jig saw blade can fit within the hole. Cut on the line in a circle. You may need to take it slow in order to make the curves. Repeat with the second hole.

3. Sand

Use some sandpaper to sand off the rough edges around the circle you cut out. Also sand down the rest of the board so it's smooth and ready for finishing. You can also use the sandpaper to round any sharp edges.

4. Stain or Paint and Seal

You can stain or paint the board/legs (which ever is your preference). Once you are done, you will need to seal the board and legs several times over. This surface is going to get some major moisture either from drool or water. Follow the directions on the label which usually includes a light sanding between layers.

5. Attach Legs

Using the appropriate hardware (the package will indicate what hardware to purchase) to attach the legs you purchased to the board. You're done!


watermelon pinterest seagreen facebook blue twitter 1
Share:

Tuesday, April 3, 2018

DIY Cat Camper House

Hello,

As a self-proclaimed dog person, I do get the occasional inkling to make something for the cats of the house. I mean, at least one of them is nice. (The other one lurks around corners waiting for the best opportunity to commit homicide.)

I started to look at some small gift to give the cats for Christmas, because, yes, we are one of those families. I found an adorable vintage camper house for cats. If the cats are going to have something, why wouldn't it be a cute vintage camper? But the Amazon one was around $30.00. Um. I love my cats...well strongly care for...but that seemed a wee-bit over priced for a bunch of cardboard.

Speaking of Amazon...you know who gets lots of cardboard? This Amazon Prime addict. Also, I've got all this free time from not running into town for TP, so I could use those skills to make one bomb diggity cat camper, no doubt.

Supplies

X-Acto Knife (New blades really work best)
Cardboard (Keep an old box, or grab a new one or foam board from the store)
Pencil
Paint & Brush (I used acrylic and house paint..whatever I had around the house)
Packing Tape
Ruler (if you want to make sure your lines are straight and measured accurately)

Directions

1. Draw Outline of Front of Camper

You can make your camper whatever shape you want. Of course I had a wonderful example with Myrtle in our front drive.  (Check out Myrtle's Journey here).


2. Cut & Draw Outline of Back of Camper

Using your X-acto knife, follow the line you have drawn. Hint: When using an X-acto knife, it's much easier to pull the knife towards you, not push it away.

Once you have your outline cut out, you will need to make an opposite side. Use the cut out side as a pattern to transfer an outline to another piece of cardboard. Cut out this piece with your X-acto knife.


3. Draw Details

I decided my camper needed windows (the lever ones and jalousie, obviously). I also needed a door  as well. Using a system of scoring (not cutting all the way through the cardboard, but rather just the first layer so the cardboard bends freely), I created a door and windows.


 4. Paint

Before you can tape anything together, you'll need to paint the camper. This is the one step where I thought I might have picked the wrong material. A white foam board would have already been colored. Cardboard also sucks up paint like no other, so you'll have to do multiple coats. I didn't find the paint made the cardboard soggy by any means, just time consuming between coats. I used a Painter's pen for the dots.


5. Create Base

Using the side as a guide, I marked on another piece of cardboard how long the front was. I made the camper about 10 inches wide. Big enough for a cat, but not too big. You will want to add about 2 to 3 inches to the width and length in order to have a side to tape the front and back to. (See the pictures for a better idea of what I'm describing).

Score at the line of the extra "over hang." You are basically creating a box bottom. Tape up the corners to create the box shape.


You may need to trim the bottom box where the door is going to hit if you don't want the base showing. (Doubt the cats mind much)


6. Using the packing tape, tape the front and back to your bottom base. Tape from the inside so it's hidden from view.


7. Add Structure to the top

Cut strips of cardboard as wide as your camper (around 10 inches in my case) and tape them to the top and sides of your camper. This will add some stability and make it easier to attach the top/side piece.


8.  Create Roof and Sides

Using one long piece of cardboard as wide as your camper, you will want to create your roof. This is the longest of all the steps. Each time there is a curve (for example, when you are going from the roof to the side), you will need to score the cardboard to make it curve.


9. Paint the Roof & Attach

This is is pretty self explanatory. You'll need it to be painted before you tape it on. (Paint won't stick to tape well, if at all) Finally, using the packing tape, attach the roof. You probably will need this tape to be on the outside of the camper, so it will show a bit.


10. Enjoy!

Here's the nice kitty enjoying his fancy new camper. The other cat is probably googling "How to Get Away with Murder."


watermelon pinterest seagreen facebook blue twitter 1
Share:
Blogger Template Created by pipdig