Monday, September 21, 2009

Siding of House

Hi Everyone!

This is a project has has been a year in the making. My house finally has siding! My dad, uncle (Keith Starkweather...great handy man out of Dow City, IA...I recommend him to anyone and everyone..he knows his stuff! E-mail me for his information!), brother and husband all took turns working on the house. All the work was done in two weekends.

To be honest, the only DIY part of this project I did was pick the trim color. It's called "prairie wheat."


"Before" Picture This the back of the house. Don't you love the green trim?


Another picture of the back of the house.


"After" Picture. This is the front of the house.
Share:

Polka Dot BBQ

A couple of weeks ago I had a Back to School BBQ, and I had the misfortune of scheduling during Ribfest here in town. No matter, I had a good group of people, and we enjoyed ourselves. I created the Polka Dot theme based off the Polka Dot fabric I love from Hobby Lobby. BTW. Hobby Lobby has many of its fabric designs available in matching scrapbook paper.


Sorry about the blur...this is the whole spread with the canopy, lights, and decorations. We were in the mist of siding so that's the deal with the trailer.


Napkin rolls. I cut up the matching scrapbook paper and made the rolls from there. I tried to be a bit "green" with recycled paper napkins, recycled plastic silverware and biodegradable sugarcane plates.


One of the table settings..the other had a full tablecloth with a polka dot table runner. All no sew by folding edges under and securing with binder clips to the table.


Napkin rolls in my pretty new thrift store bowl. (got to love 10 cent bowls!)


Paper lanterns hanging from tree...isn't that shed ugly?!? I'm hoping the shed goes bye bye in a few weeks.


Closer picture of the paper lanterns (and my DIY bean bag game and DIY fenced in area for our dogs!)

I didn't get a picture, but I also had bowls and serving platters in the colors of the polka dot fabric. I also used the scrapbook paper to decorate the table for the buffet dinner.

I think the polka dot theme would be great for a baby shower. It's fun and playful and unisex!

Share:

DIY: Outdoor Canopy

If you’ve read anything craft related over the past couple of months, you’ve been bombarded with outdoor projects. One project I’ve always admired is creating some sort of living outdoor space. One “work weekend” this summer, I decided to create a fun project.

First, I had to get the materials. To be honest, this was completely created on the fly. I went to the hardware store and just bought some stuff.

The materials I ended up with:

4 copper pipes. I found PVC too flimsy. I like the design element of copper as well.

4 Tiki Torch stakes

4 Tarp plastic hooks (found in camping section of retail store)

1 canvas paint tarp

4 plastic clamps

Twine

I didn’t cut the pipes at all. The size I purchased seemed to work just fine.

1. I first got my shovel out and started digging holes. I marked the pipes with tape so I knew how deep to put the pipes in. I had a sort of patio already made so I used that for the dimensions. I figured if I couldn’t find one piece of canvas to fit the whole thing, I would sew something. You might want to measure out the placement of the pipes based on the canvas you purchase.

2. Instead of just putting the pipes in the ground as is, I used some Tiki Torch stakes I already have. You may have seen these before. They are sold next to the torches and are pointy. The pipe slips through the stake. I was lucky that the pipe I picked out fit perfectly. This allowed the pipe to be even deeper into the ground which makes it more stable.

3. After digging the holes, I went around putting the pipes in and filling the holes back up with dirt. I stepped on the dirt to pack it down.

4. Next, I had to come up with some method of putting up the canvas. While wandering around Wal-Mart I found these awesome clamps in the camping area. They are for tarps and clamp down with holes to tie rope around. I had spray paint out for another project so I spray painted them (totally not necessary but why not)

5. So, now I have poles, a canvas canopy and a way to attach to the canvas without cutting and creating holes in the canvas. But how do I attach the canvas to the poles? I grabbed some plastic clamps I already had for my photography things and put them in the holes on top of the poles. Then, I tied the twine around the clamp.

The finished product is a homemade canopy for $50.

It's not perfect by any means. I have since made some changes. I put little holes in the canvas to prevent the canvas flying away in the wind. I am also going to get another canvas and sew them together so the canvas fits the area better. I think I might dye the canvas to make it nicer. These are just potential idea to make the canvas seem more put together.


This is the backyard before I started. The "patio" area hasn't been sprayed yet so you don't see the gravel we put down. It looks like grass at the moment.


Putting the pipes in the ground...


Another pipe done...


Lights for the outdoor area


Outdoor area...weeds are starting to die


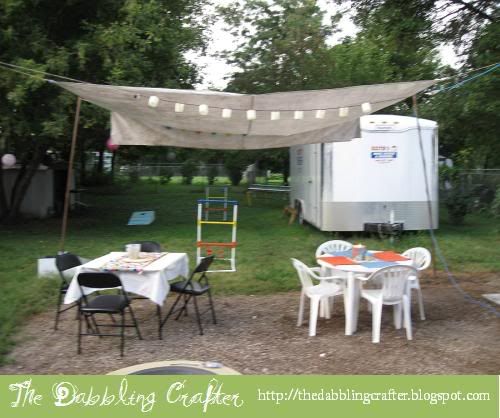
Here is the outdoor area ready for a party. The weeds in the patio area have been killed off and there are lights hanging from the canopy. Not bad for 50$!
Share:

Tuesday, September 8, 2009

DIY Wednesday: Bridal Shower Invites

Hi Everyone,

It's not quite Wednesday, but since I'll be going home soon and won't have access to Internet, I thought I would post this now. (I got rid of Internet at home and it was a fantastic idea. I'm so much more productive without the Internet to distract me!)

I'm hosting this bridal shower in a few weeks for one of my good girl friends. She was the maid-of-honor at my wedding, and I'm hoping my shower can live up to the one she threw. I have loads of things planned. I'm not going to post anything about the decorations, games or lunch until after the event. (I have to keep something secret! I don't want to ruin the surprise) Here is the invitation that went out on Saturday. I'm quite excited to get to the big party day. I've been planning this shower for a year!

I didn't take a picture of the matching envelopes, but they are simple white with the swirls from this invite on the side. Whereas I got the invites professionally printed, I printed the envelopes myself. They turned out okay but not nearly as neat as the invites themselves.

I've removed some of the personal information, so please excuse the bars over my phone number and such.

Enjoy!


Share:

Updates...

So, this summer I didn't really have access to a point and shoot camera, hence the lack of posts about my projects (pulling out the nice camera can be such a pain at times). Plus, I was working on 1 big project that I can't post about here (and it's still going on...I feel like it will never end!!!)

So, I'm back from my summer internship and I have loads of projects I'm working on.

Here are projects that I'm about to finish up:
  • a homemade island for my kitchen
  • custom napkins and table runners for a bridal shower I'm throwing at the end of the month
  • a custom sign for the bridal shower (among other decorations)
  • a painting for my craft room
  • siding on my house (okay..this is really a project my husband, dad and uncle are doing, but I thought I would throw it out there)
  • all sorts of fun decorations for a BBQ I'm throwing on Saturday

Here are some projects I have finished (and will hopefully be posting some pictures soon!)

  • completion of the "man room" (this was my husband's anniversary gift)
  • finished some art in the kitchen
  • made a lunch bag out of that dot fabric I'm obsessed with
  • bridal shower invitations
  • created privacy panels for the bamboo blinds I just hung (by myself...using power tools thank you very much)
  • various digital scrapbooking (I used to do actual scrapbooking, but I found I was creating most of the art on my computer and printing it...pointless...may as well just make photo books)
  • Bridal Shower Bingo cards for the shower I'm hosting

Okay..well I'll try to get on that picture posting...but until then you can see some of the pictures from the weddings I've photographed this summer at my other blog: http://kristamariephotography.blogspot.com

Share:
Blogger Template Created by pipdig