Wednesday, November 28, 2012

Handmade Christmas: Name Puzzle

Hello There!

I have a really fun gift I made over Thanksgiving. My mother-in-law came up with the idea, and I did the execution of it. We made a wooden puzzle out of the name of my daughter!

This project was pretty easy. I should have taken step-by-step pictures, but it's so simple, I didn't. 

1. The first step was cutting two pieces of wood (about a quarter inch thick) to the same size. One will be the back ("back piece") and one will be the piece you cut ("puzzle piece"). The size doesn't matter as long as they are the same, so use whatever you would have sitting around, or buy some precut wood at Hobby Lobby.

2. Using a pencil, I drew out my daughter's name. I decided I'd paint on the "i" dot rather than cut it out. 

3. This is the "tricky" step. I used a tool called a Roto Zip to cut out the letters. This is what it looks like: 


If you didn't have a Roto Zip saw available, you could also use carefully use a band saw. Now, my lines aren't completely straight, but I figured for a kids puzzle that was fine. It also makes so there is only one "right" way to put the piece in..otherwise there would be two ways on the "l" and "i." Since I'm a weak pregnant lady, I also struggled getting the bit in right away when I started a letter. After screwing up a few boards, my father-in-law brought over a drill and had me drill pilot holes and start the Roto Zip while it was in the hole. That worked much better.

4. So, now I have cut out letters, a cut out puzzle piece and a back piece. I primed everything up really good, and then gave it a funky paint job with some acrylic paint.


5. After painting each piece, I glued the puzzle piece to the back piece. I used some wood glue and clamps. You could do this before painting if you wanted to make sure you painted any glue that seeped out. I chose not to since I didn't want my back piece to get paint on it.

6. Now that I have everything painted and glued, I sprayed everything with a clear coat/glaze. (I used a spray glaze to get an ultra shiny finish) Now, you'll want to think about if you want to do this. I don't have a child that puts everything in her mouth, but if you do, you will want to be aware of the paint you pick and if it's safe for children.

7. After the clear coat dried, I have a finished puzzle! I thought about putting knobs on each piece, but decided I'd wait. There is a bit of a gap between the letters and the puzzle piece since the Roto Zip won't cut completely flush.


 Follow Me on Pinterest

 
Linked Up At:
Share:

Tuesday, November 27, 2012

Handmade Christmas: Felt Food

I am just a little over a week away from having Baby B. I can hardly believe it. I have been hard at work to finish all the Christmas presents I had planned. Pretty much every night has been craft-a-thon. I'm walking like a 90 year old woman, because I'm so sore. 

Last year my daughter got a play kitchen and has finally took a real interest in pretending to play cook. I decided to make her some fake felt food to play with. I made a few "sets" to wrap up.

The Junk Food Set: donuts and cotton candy. Color is a bit wonky, but the cotton candy is actually bright pink.

Veggie and Fruit set: Strawberries, Head of Lettuce, Corn on the Cob, Banana, Eggplant, Squash and a Carrot

Sandwich and Pasta Set: Bread slices, cheese, bacon, tomato slices and lettuce leaf with some pasta.

Okay, it's not felt food, but it's felt at least! I made a headband with some fold over elastic and purple bow.


 Follow Me on Pinterest


Share:

Tuesday, November 13, 2012

I Need Your Help! Pick the Fabric!

Hello Everyone,

I have been working hard on Christmas gifts and baby related projects. One of the last bigger projects I want to do before baby comes is make a crib skirt. I'm going to make it very easy and no sew with hem tape and velcro, but I need help picking the fabric.

As you know, we're doing a "hunting lodge" nursery. I have gotten these curtains from Ikea to separate the room: http://www.ikea.com/us/en/catalog/products/40210925/

Once I have one print in the room, I get scared to use another one! So, I'm torn on which fabric to choose. As an FYI, I have grey walls, some brown furniture and some orange accents..

Both fabrics come from my favorite online fabric store, Hawthorne Threads

The first option is from Camelot Cottons and comes from their Day at the Zoo line. It's called "Tree Bark." It comes in three color options, Natural, Orange and Green.


The second option is also from Camelot Cottons and comes from their Woodland Adventure line. It's called "Tree Stripe." It comes in Brown and Blue color options.


Which do you choose? Why?


 Follow Me on Pinterest

Share:

Monday, November 5, 2012

Show & Tell: Art for Baby B

Hello!


We decided (or maybe I should clarify, my husband decided) that we should keep the baby's name to ourselves until he's born. Our daughter's name was no question from the beginning. I had the name picked out from the time I was 8, and my husband liked it, so there was no discussion.

This little baby boy took much more discussion. Eventually we found two names that we liked, and finally I decided that one was better than the other with the middle name that was picked out years ago.

It's be quite quite difficult to keep it to ourselves. I slipped to my mom once (she claims she didn't hear it). I also have done a couple of projects with the baby's name and I really really really want to share them, but I can't. (Boo!)

Our nursery theme is "hunting lodge." I'm thinking hunting lodge like in the time of FDR. If you're from South Dakota (or have visited), I'm thinking the lodge in Custer State Park. Rustic, old and does not feature cameo from one end to the other. So I've been trying to use browns and oranges and greys. Works out well because my husband is a bird hunter, so his idea of hunting is some tan duck cloth and blaze orange.

One thing I knew from the minute we were expecting, is that the major piece of art over the crib would be done by our daughter. I thought it would a cool way to get her involved in the nursery, because, if I were her (and I suppose at one time I was since I'm a big sister to a little brother as well!) I wouldn't be so happy about little baby getting all this new stuff and getting to sleep in the same room as mom and dad!

After some Pinterest searching and thinking, I decided that with a 2 year old this method would work the best: I cut the name out of vinyl. I also cut out a silhouette of a pointing dog. I knew this would make my husband quite happy since he's in love with our german shorthair pointer. (and keeps saying things like "Little Boys should have puppies".....hmmm. I think new moms would agree that getting a puppy and baby at the same time is less than ideal!)

After I cut out the vinyl with my Silhouette, I had my daughter go to town painting it. I would use one color at a time, let it dry, then paint the next coat. I helped fill in some of the gaps along the way, but for the most part my daughter did everything. On the last coat while the paint was still wet, she (not me!) pulled up the vinyl (she had quite a lot of fun with this since they are basically giant stickers!)


I can't share the name, but I can share the pointing dog. Once we have the baby I'll have a detailed post of the nursery to share (and better quality pictures). My daughter knows she made it. She often points to it and says, "Lila painted for baby brother!"


 Follow Me on Pinterest


Share:

Friday, November 2, 2012

Let's Do This......Again...But for Real This Time...Seriously.

It's November, which means I'm thinking about NaNoWriMo again.

If you've never heard of such a thing, let me explain. It's National Novel Writing Month. It's a challenge to write a novel is just a month. To be more percise, it's a challenge to write 50,000 words in a month.

For about four years, it's been on my bucket list. I have a very short bucket list actually. It's pretty much just NaNoWriMo and restoring an old RV. If I were to have to live like I was dying, it wouldn't have much to accomplish. I should probably start working on that list...after November, of course.

I tried last year. I made it to about 5,000 words before I was sick of what I was writing. I was trying to write fiction, and I'm not so good with fiction. (Not to assume I'm so good with the non-fiction either) I can never get the correct voice, and it's just a big ol' mess. 

This year I'm trying to do a short collection of "funny" (funny to me, but I'm also easily entertained) stories from my life. I know with the baby on the way and a crazy two year old, I might be fighting a losing battle, but it seems like this might be the last time in a long time I'll have the "extra" (if you mean writing on my breaks at work) time.

Good luck to me, and may the odds be ever in my favor....

Share:

Thursday, November 1, 2012

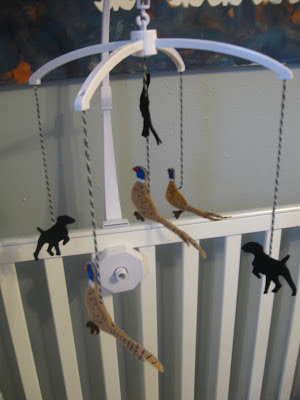
Show & Tell: Pheasant and Pointer Baby Mobile

Hello!

I'm pretty excited to finally get to share a project that doesn't involve the baby's name! Whoohoo!

If you've read my blog over the years, you'll know that years ago I made a mobile for my daughter to match her owl theme (Visit the post here). At the time it was hard to find little girl owl items. Uh, not so much the case anymore!


I made the mobile from fabric and interfacing and used the parts from a rather ugly mobile. The tutorial ended up being featured on OnePrettyThing.com and my tutorial on Scribd has had over 4,600 downloads!

I decided there was no reason I shouldn't reuse the mobile parts and make the mobile more "hunting lodge" friendly for Baby #2. I was a bit worried about making the mobile this time around. Could I make felt pheasants? They are bit more difficult to trace and cut than owls. I made one and it wasn't really that cute. (Okay, Okay...it was downright ugly)

I did a lot of googling of pheasant images...well my husband did a lot of googling of pheasant images and gave me "proper" examples. Apparently, I don't know the difference between wild and pen raised pheasants. With the help of some hot glue (I tried to exclusively sew the first one), these pheasants turned out pretty good! At least you can tell what they are...if you know what a pheasant looks like that is!

Since I spent so much time on my daughter's mobile, I couldn't just throw away the owls I made. So I decided to take some of the owls along with the heart I had on the mobile and make some art for her room. Now she'll have a piece of her mobile with her as she grows up!


And here is the pheasant and pointing dog (German Shorthair Pointers, of course) baby crib mobile!


I also finished up the other half of the nursery! I have the art on the wall (I've edited the name featuring pieces), clothes on the old rustic ladder and the new changing pad cover. I'll talk more about this in another post.


 Follow Me on Pinterest

Share:
Blogger Template Created by pipdig