Sunday, December 26, 2010

DIY Christmas Stocking

Happy Day After Christmas!

Okay, so I'm always a bit late on...well everything...so here's a late Christmas project. I would like to point out that I don't think it's completely crazy to do a Christmas project after Christmas. I might do some to get them done before I put all the Christmas stuff away for the year. Or maybe you got a sewing machine for Christmas finally and you can do some projects.

Any who, I did do this project before Christmas and Lila did use it on Christmas morning. So I'm not completely behind. :)

My new dear daughter needed a stocking. I didn't want to buy one. I wanted her to have unique one made from the heart. I saw this fabric, and I knew I wanted to use it for something. I did a simple outline of an existing stocking I had, then I cut her name out of felt and put that on the top cuff of the stocking. Pretty easy project but it was fun.


Share:

Saturday, December 11, 2010

Idea Thief: Easy Christmas Trees

Hi There!

I had to share this tutorial for some Christmas tree decorations. I have a larger house this holiday than I have in previous years, which means my decorations don't stretch as far. This is a great cheap project. Grab some streamers and your hot glue gun...and of course glitter!

Check out Creative Chaos for the tutorial!


Share:

Tuesday, November 23, 2010

Idea Thief: DIY Duvet Cover

Hi There!

I have been pretty busy with....well I'm not really sure what is keeping me busy. But it seems like I have no time. (Suppose that's motherhood?)

Well here's an awesome project. A really neat duvet cover that will run you about $45 dollars for a king size. I need something for my new bed and this project may eventually make it on my To Do list.

Check out Made by Lex for the tutorial.


Share:

Tuesday, November 2, 2010

DIY Wednesday: Ten Minute Tutu

Hi There!

As you know, Halloween was this week. I wasn't going to do a costume for my little one since she is only five months. Then I saw fairy wings at the dollar store, and figured, eh, why not do something little.

I had tulle given to me by my baby's godmother from my baby shower. So, what can I do with it? Make a tutu for my little baby girl!

For a printable PDF tutorial, click here.


Playtime Tutu

Materials:

-Tulle (I alternated a white tulle and a purple tulle. I ended up using about 6 yards total. Tulle is quite cheap. To save yourself a little cutting, you could use the spools of tulle as well)
-Elastic
-Bucket

Step One: Create Waistband

You will first want to measure out the waistband of your little one. Of course elastic will stretch, but you will want to get a rough idea of how much elastic you will need. Add two inches to the amount you measure.

Overlap the extra inches and sew a zig zag stitch. Ta da, you have a waistband!

Step Two: Cut Tulle


Decide how long you want the tutu to be. If you'd like the tutu to be 20 inches long, fold over the fabric so the doubled up fabric is 20 inches. (It's better if you measure long..you can always cut the tulle once you've completed the tutu if you need to go shorter) Cut along the raw edge.


To create strips, now cut length wise. I made my strips approximately six inches wide; however, I did not measure each strip. I just eyeballed the width.

Step Three: Put It All Together

Grab a bucket. Put the elastic waistband around the bucket. Slip tulle behind the waistband to create a loop and pull remaining tulle through. You have now knotted the tulle on to the waistband. Continue all the way around the bucket.


You now have a fun tutu for dress up, for pictures or for costumes! You can experiment with adding embellishments like flowers or even bows. I think I might try to weave some satin ribbon around the top.


Share:

Wednesday, October 20, 2010

DIY Wednesday: Lace Flower

Hi There!

I have a little project to share today. I am one of those moms that likes to put flower headbands on her little baby. I like how it makes my little one actually look like a girl (since all babies look alike).

This project is very easy and for the flower, you don't even need a sewing machine!


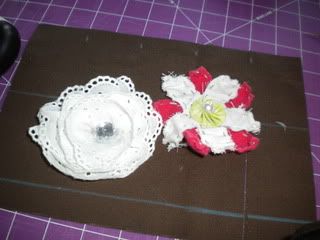
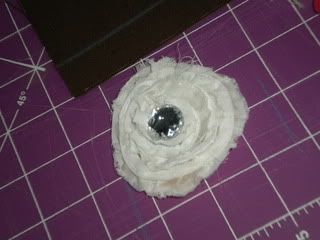
I used this tutorial from Little Miss Momma to make the white lace flower. The other flower is a gift from my sister-in-law Tessa (she made the quilt featured in a previous post)...no tutorial for that one since it's her custom design! You can either attach the flowers to headband like the tutorial suggests. Or do what I do and attach the flowers to alligator clips with hot glue. That allows you to attach the flowers to either headbands or hats.


This flower actually came as a mistake. I did the lace flower, but it kinda turned out funny. So I cut away the lace and created this frayed flower. I kinda liked it so I kept it.


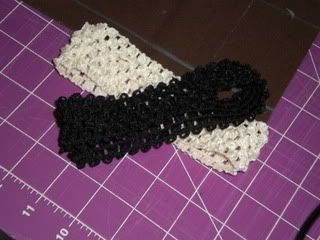
Now you can purchase a headband which can cost upwards of $5. Or you can make your own. Go to the ribbon section and buy the stretchy headband material. At Hobby Lobby the ribbon costs $1 a yard. You can makes lots of headbands within one yard. So...in this picture which one is the store bought one? Which is the home made one? You'll never know!


Share:

Friday, October 8, 2010

DIY Wednesday: Spray Paintin'

Hi There!

I have been a spray painting machine. I have spray painted a shelf (see below), planters, filing cabinet and my ribbon holder...just since I moved. This shelf went from a natural colored shelf to a blue one. (which I've indicated will match whatever color I decide to paint the walls)

After a lot of spray paintin,' I've decided to share my spray paint tips.

After:


Blue Rust-Oleum Spray Paint High Gloss

My spray paint tips:

1) Prepare your surface. I neglect this step the most. Most of all, you will want to make sure that your surface is clean. Paint will peel off a dirty surface. For even coverage and paint that will stay for years, you may want to sand the surface & wipe down with cheesecloth and/or use a primer.

2) Shake....then shake some more and when you've thought you've shook enough, shake for another 30 seconds. Shaking your spray paint can insures you will have a long even spray.

3) Use long continuous strokes. Start at one end of the item and spray continuously all the way down the item.

4) When drip happens, let the paint dry first. Then sand the drip, and repaint.

5) High gloss looks nice and finished but will show more flaws. Matte is more forgiving but looks like spray paint. Use the correct paint. Read labels. If you're going to spray paint a plastic table, use the plastic fusion spray paint.


Share:

Craft Room Update

Hi There,

We are still moving into the new house. (I don't understand how I can still have boxes to unpack. It just doesn't seem possible) I have been working on the craft room here and there and it's starting to get there. I'm going to eventually paint the room, but I think that should probably wait until I have everything else done....at this rate it will be years.


Here is the sewing corner. I eventually want a desk and a office chair for the sewing machine, but I'm waiting for the perfect fixer upper desk or an affordable one. I just got the bookcases (super cheap ones since I know I'll probably have to get different ones to fit a different space in a couple of years). The blue trunk is my photography supplies...I don't have a better place to stash it yet.


Kitchen island turned cutting/project table. It's the perfect height for cutting. The only problem is it seem to also collect projects. In this picture alone is a curtain project, infant hair bows, infant headbands....all of which are still hanging out.

Oh... I have to share my fun find. Two pairs of Cole Haan shoes..one pair was $2 and the other was $15 plus Coach tennie runners for $15. I love thrift shopping!


Share:

DIY Wednesday: Ribbon & Wrapping Station

Hi There!

I was doing my daily One Pretty Thing cruising and found this tutorial for a ribbon and wrapping station on Someday Crafts. I was so excited that I actually tried it only a few days after she posted it!

I did my own little twist. I had this trim left over from my DIY island (which is now my craft room cutting table!) and decided to use that. I already had the blue spray paint for the dowels. Which means this ribbon holder cost me a whopping seven dollars.


By the way...isn't that lovely dark green color on the wall really really....boyish?!? I matches the blue dowels oh so well. (it will eventually match whatever color I pick out) I know it's something my husband would think is just fine...but this is a craft room and I am definitely going to be painting it....eventually. I should probably finish unpacking first.

Share:

Thursday, September 30, 2010

DIY Wednesday: Revamp Rod Pocket Curtains

Hi There,

This project is quite simple but can really change the look of a plain curtain panel.

Curtain heading is the terminology for the top of a curtain. The most popular is a rod pocket. It looks like this:


(Picture from Target.com)

I don't particularly like the rod pocket look. I think it's a bit more traditional than I like. I am more of a modern type of girl. So, the wave heading is exactly what I love. I had it on a different pair of curtains. It looks like this:


So, I found curtain panels that are the perfect color, inexpensive but were rod pocket. How do we fix this? Well it's pretty gosh darn easy!

Materials:

Scrap Fabric
Curtain Panels
Sewing Machine (HOWEVER, you could use hem tape for this! No sewing required)

Instructions:

Step One: Cut

First you will need to cut your tabs. I had this brown canvas material left over from other projects. The good thing is you can use whatever scrap fabric you have sitting around.

You will need to cut the tabs to the following dimensions: length: 3 inches, width: 2 inches.


Step Two: Sew on Tabs

I placed my tabs six inches from each other. This meant that on average I had 7 tabs on each panel. (I say on average because I have the habit of eyeballing things)

I then did a simple straight stitch along the top and the bottom of each tab.


Step Three: Hang Those Curtains!


So, there is modern fun curtains in just a few simple steps!


Share:

Monday, September 20, 2010

Just Had To Share: Baby Quilts

Hi There,

I had to share the craftiness of my sister-in-law, Tessa, and my mother and late grandmother, Myrtle. I should also mention that while I don't have a photograph taken yet, my friend Sarah did a fantastic crocheted blanket for our baby as well. It's really soft and heavy (and usually I steal it to use when I'm rocking our baby).

Tessa made this awesome quilt for our little baby. I'm pretty sure that I can't even attempt a quilt now because it will look so silly next to this masterpiece. Her quilt manages to be 1) For a baby 2) Modern and 3) Features owls (our nursery theme). The pictures don't show off the details like our baby's name hidden in the stitching along with her birthday.


This baby blanket was first started by my grandmother Myrtle. Once she got weak from chemo and radiation, she handed off the blanket (and others she had started) to my mother. My mom worked very hard to finish this blanket. I took some of our baby's personal information out, but you can see all the hard work and love that went into the blanket. (Not to mention it traveled from Missouri to South Dakota and survived a house fire!) While our baby might not remember meeting her great grandmother in the hospital after she was born, she will have this blanket to remember her by.


Share:

Monday, September 13, 2010

DIY Wednesday; Shower to Window in 2 Easy Steps

Hi There,

This is a simple project for those who need cheap window treatments. Curtains are expensive especially when you have lots of windows! I got basic panels for downstairs (we have lots of windows downstairs) but I wanted something with a bit of print for the bedroom. We don't have a headboard yet and the dressers are white. There needed to be something.

Now, I've made a decision to work with the colors already in the house which means purple in the bedroom. Purple isn't my favorite, but I found some inspiration pictures that pair purple, brown and blue. So, I decided to go with brown curtains.

Printed curtains will probably end up costing you about 20$ a panel. I needed three. I instead got two fabric shower curtains. 1 shower curtain is the width of two panels. I cut it down the middle and hemmed the cut edge. Now, you don't even need a sewing machine for this! You could easily use hemming tape and an iron.


Target Shower Curtain: $21


Curtain cut down the middle. I took an iron and folded over the exposed edge by about an inch.


Final product. Turned out pretty good! I used book rings to hang the curtain. Don't use the rings from the shower department. They are way over priced. Head over to a Hobby Lobby and get 12 rings for a couple of bucks. (compared to 6 for 6 dollars at some stores!)

Now I should say that I did add some white fabric I had hanging around to the back of the panels to add a bit more privacy. You could skip this step if you have a blind hanging behind it, or grab an old sheet and attach that to the back. I don't personally care much what the back of a curtain looks like.

Enjoy your fantastic curtain!


Share:
Blogger Template Created by pipdig