Monday, February 28, 2022

DIY Electric Fireplace with Built-Ins

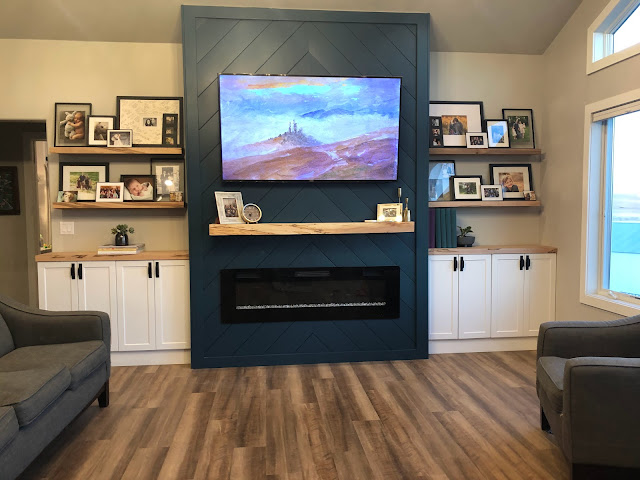
Electric fireplaces are trending in the world of DIY. I'm going to share how we built our setup and try to give tips on planning your own fireplace built-ins. 


This idea certainly isn't new. It's been going around Pinterest for maybe a year or so. I saw the idea originally on Nesting with Grace (a fantastic home decor account to follow) and decided to really go for it in our new home. Our home is beautiful, but it's lacking some custom cozy touches. I thought a huge statement piece in our living room would be a good place to start. Plus the idea of sitting by a fire watching snowfall on the lake sold me. 
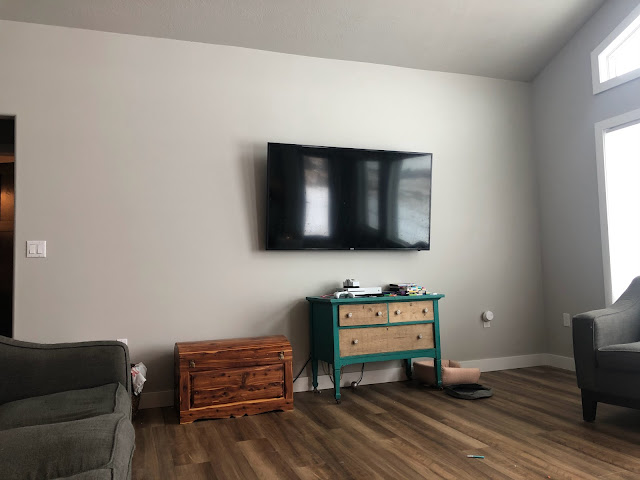

The first thing you're probably wondering is why we didn't just get a gas fireplace put in when we built our house. It was certainly an option. However, it was a 30k option. I like fireplaces and all, but not for that price tag. Electric fireplaces have really come a long way from a picture on a screen. Even a top-of-the-line one with real sound and heat will be substantially less than the gas fireplace quote we were given.

I can't give you exact measurements on what to do with your fireplace setup because the piece has to be built specifically for the space you have. However, I can explain how we came to our measurements. 
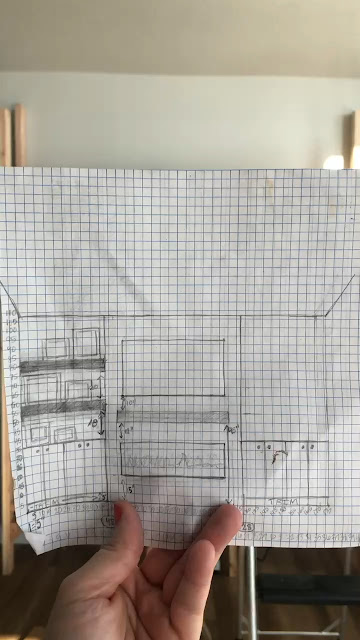

Graph paper is your best friend. I start all my projects on graph paper (or on the iPad with a graph notebook page and my iPad pen). Measure out your space. To determine the size of the fireplace, I measured our TV. My husband is not going to part with his big TV. I went fireplace shopping online. I found a fireplace that was slightly bigger than the giant TV. I graphed out a fireplace surround that was about 6 inches bigger on each side of the fireplace. The mantle is about two inches wider than the fireplace. 

Once I knew how big the fireplace was going to be, I had to decide on the cabinetry around the fireplace. I knew I wanted narrow-depth cabinets so the fireplace stuck out further but wasn't too far into the room. I looked at pieces of individual furniture like a credenza or hutch. (Faux Farmhouse has a piece that's built-in, but looks like a piece of furniture and it's beautiful) In the end, upper cabinets were the ticket. I could get stock upper cabinets in white from Home Depot that were almost exactly the correct size. I have small filler pieces to make them perfect, but it very close to the perfect measurement. Four 24 inch uppers were ordered and shipped to our local store. I did this early on because it's was a month lead time at the time. That was back before COVID. Now you might be waiting much longer. 
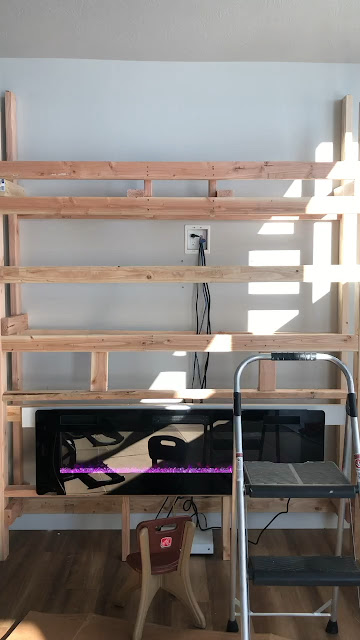

My husband went to work building the 2x4 framework for the TV and fireplace. You have to frame out the fireplace box and supports for the TV. He also worked in a "secret" door on the side so if we need to plug or unplug wires, we're able to get access behind the fireplace. The secret door is simply held in place with a sliding lock. One thing I would change about this project is the space behind the fireplace. It is VERY narrow. My husband can fit (barely) and the children can. I would probably add a couple of inches if I did it again. This framework was attached to the ceiling and wall studs and is SOLID.  

Once the framework was done, the fireplace is attached to the framework. My husband added a whole lotta shiplap. Shiplap is definitely a trendy thing right now, but you could easily use plywood and then add brick or stone if that's more your jam. I wanted something dramatic so the shiplap cut on an angle was perfect. 
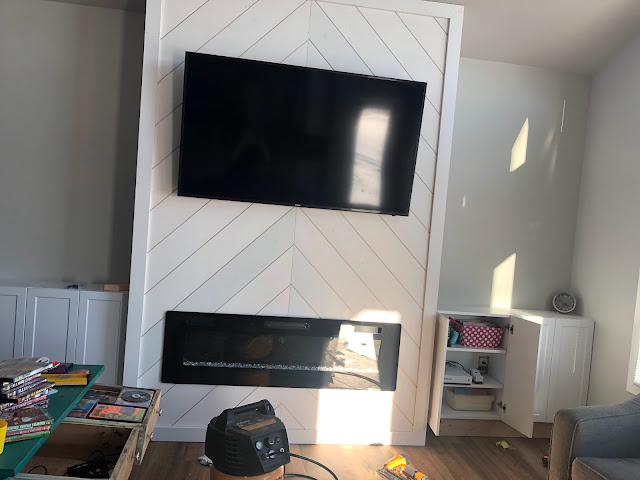

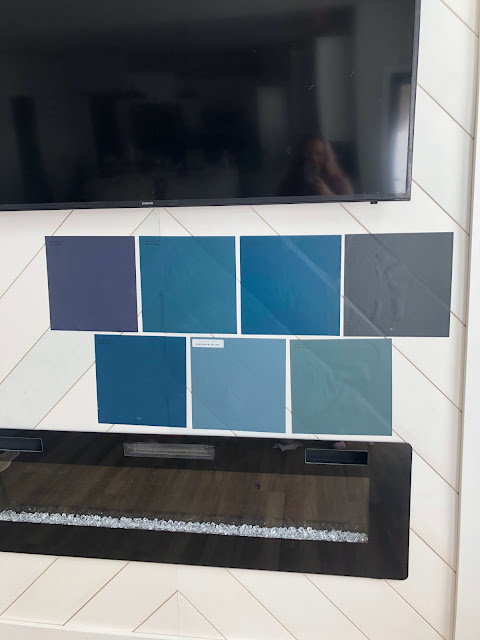
I used a company called Samplize to get paint sample sheets for the fireplace. I loved this service. I imagine for walls it's even more convenient because you can move the sample around the room and sample different lighting situations. 

Once the fireplace was painted and the cabinets installed, it was time to add in a mantle and floating shelves. We are a handy family and my husband created the mantle and floating shelves using solid slabs of ambrosia maple (the floating shelves) and spalted maple (the mantle). They are attached to the walls using metal rods welded to a metal bar. 
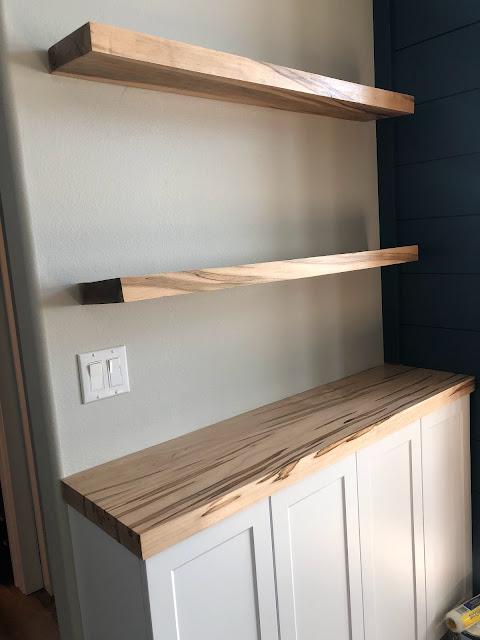


I finished them with a new product. The name of it is and it's a poly wax hybrid finish. I used a matte finish because I wanted the wood to look raw without actually being raw. My kids will definitely leave wet cups on it, and I wanted to avoid watermarks. I liked the product. It did slightly change the color of the wood, but it was definitely better than poly. Overall we've lived with the fireplace for over a year now and don't have any complaints. I've upgraded to a Frame TV which is the perfect piece over a fireplace and the electric fireplace does a great job putting out heat on cold evenings.

Share:

Saturday, April 24, 2021

Buying a Factory Built Off Site Custom Home

Surprise! We recently moved and built a new home. It was a year and a half adventure. I will try to give a honest review of our experience with building a home off site. This was a long process, so sorry for the length.


We weren’t going move again. The plan was to eventually build on to Ugly House and to retire there. I honestly loved all the renovations we made to the home and was excited for the next phase of renovations we had planned. 

One April weekend I was out of town buying supplies for a bathroom renovation we had planned, and my husband called me with an interesting offer. We had to been contacted asking if we wanted to buy an acreage. My husband had often commented to the owners that their acreage was his dream property, and as they retired and move into town, they had remembered his comments. I came back from my trip early, and we headed out to take a look. As we drove down the half mile winding tree-lined driveway and the lake came into view, it was game over. Ugly House had been beat by 20 acres of once in a lifetime lake front property. Land like this doesn’t come available in our area.

A week later the paperwork was being drawn up to buy the property. Our future plans were thrown out the window. Ugly House was a project to be finished by another family.

Initially we hoped to salvage the original farmhouse. We love historic homes. Well okay, I love historic homes. However, the cost of renovating, moving and, adding on was prohibitive. We decided to build. 

Anyone who has built before knows that building a house is not for the faint of heart. We found a floor plan we loved and had four different contractors give us estimates. They were expensive. Like a 100k over our budget expensive. We could have made them work, but we would have been stretching ourselves to stay in Ugly House until the home was built. Not to mention on-site builds take time especially with the unpredictable Midwest weather. Each minute we were in Ugly House was time were paying two house payments. Not to mention we didn’t want to show and sell while living in Ugly House. I worked from home, we have 5 dogs and 3 kids. The house would be a nightmare to keep clean and leave for showings. (We couldn’t have known then, but COVID changed the housing market completely. We had 10 so people inquire about buying our house the minute we announced we were building. We sold it directly to a couple we knew and never had to list it.)

At this point, we had officially owned the property for 6 months and had been pursuing building for 9 months or so. My husband had a client recommend a company that builds the homes off site and moves them on a foundation. We started working with that company. From the first interaction, we were very clear. Budget was our #1 concern. We could jazz up a house down the line (we do love DIY) so a floor plan in our budget was paramount. We had plans drawn up, and walked through another build they did. We worked with this company from October 2019 until March 2020. We (finally) got an official estimate. $100,000 over the budget they had promised to stick to. We walked away and a week later the world shut down. (Fun fact. Apparently their company was sold and decided to stop building off site and never told us. Their current operation couldn’t handle the plans they drew up for us so they were calling around trying to subcontract the entire job to another contractor including one of the contractors we had already got an estimate from directly.)

On a random day off, I stopped by Custom Touch Homes in Madison to tour their homes. After an hour with a sales associate, I had plans drawn up and an official estimate to take to the bank. It was incredibly fast. Everyone else took weeks to draw up plans then weeks for get bids and create an estimate. The reason everything goes quickly with their operation is because they have everything in house including the architect. One of the biggest hold ups during a build is the scheduling of subcontractors. Especially in a COVID world, this was helpful. This particular business basically went on lockdown. They kept their workers safe by keeping everyone else out and doing a ton of safety checks. We didn’t even get to see our house in person until it was almost done.  

Once we had the bank paperwork done (which took a couple of weeks even with preapproval) and contract signed, our house was scheduled. Honestly, the process was so quick and well organized that I sometimes had to step away and take a breath. I had a notebook full of what I wanted in the floor plan and all the finishes (I had after-all been planning this for a year now and I am very much a type A person). Even with all that pre-planning, I felt overwhelmed at the speed of everything. I think if you aren't prepared, you could get put on the spot and pick something you don't love. 

After the contract is signed but before building starts, you customize and finalize your floor plans. You have a choice day where you pick all your finishes. They do have a set of materials to pick from, but you can deviate from those. For example I had a particular flooring picked out for my bathroom in Ugly House. I gave them the information, and they ordered it for this house. I also had a dream bath tub picked out, so that was special ordered as well. Something that I found VERY helpful on choice day was my mood boards. Before choice day I had created a vision/mood board for each room with the finishes I wanted. I had made lists of what color tile, cabinets, floors I was looking for. So instead of feeling overwelmed to make all the house decisions on one day, I could just find the finishes that matched what I had carefully picked out over the past year. I also could look at the house as a whole rather than in pieces. I would recommend this for anyone that is building. 


Once building starts, our sales associate sent us weekly updates and pictures on the progress. Their set-up is basically 4 lanes of houses inside a massive building. The first houses in each lane are getting framed. Second house in the lane is getting electric and so on. So each department basically goes down the line and does their job. Slowly the house makes it way down the lane until it’s the last house. Then big warehouse doors open and the house is slid on a truck to be delivered. You have one contact person through the entire process. The house moving day is really quite easy. The house movers do all the work with getting power lines moved. You just wait for the house to show up and they handle placing it on the foundation. It's pretty remarkable to watch (and very unnerving). I have a video of the process on my instagram.

Here's the progress of our house in their warehouse:


I think one of the misconceptions I run into when I tell people we used an off site builder is that this is a mobile, manufactured or modular home. There’s nothing wrong with those homes, but this home is 100% stick built. It’s framed all in one piece like your on-site homes. It wasn’t pieces when it was delivered.  They make the house strong enough to be easily moved as one unit. There’s some preliminary research by FEMA that these types of homes actually are stronger than on-site homes based off post hurricane damage data. 

Over-all the process was  easier than the traditional contractors we were initially dealing with simply because there were no subcontractors. They didn’t need to get bids from them or schedule them. The process took 2 months from the date they started. The moving of the house took about 12 hours to get on the foundation (more on why that was longer than expected to come). Also our house didn’t go over budget because they don’t have to worry about a subcontractor bid not being accurate. The inspections are done just like an on-site build, but because they can do them as part of their assembly line, they are also faster. 

In the spirit of transparency, there are two things to talk about. First of all, while they make all kinds of modifications based on whatever your heart desires, their homes do have some limitations. There are size restrictions since it does have to fit on a road. Our home is rather large at around 3,700 sq feet with the basement, but it had restrictions on width, length, and height. So I could make all the floor plan edits I want, but it still had to fit in that footprint. You also have to stick to a ranch style which initially I did not want. However, with a walkout basement, we don’t have a traditional ranch. I would have pitched the vault in our living room higher if I could have. Also, there are some truly beautiful custom homes out there that my house can’t hold a flame to. There is a reason some builders are more expensive. The materials and craftsmanship is worth their asking price. You also don't get to see and tour your home as often since it's on their premises, not yours. We didn't have any issues with something being done wrong, but that's not uncommon during a build. We also decided to wait on a big deck on the front and a garage and do those separately. The cost on those two items seeemed high compared to other contractors.

Second, there was one aspect of the house build that was a sore point and added a couple of months to the build. We used the off site builder’s sister company to build the walk out basement. We weren’t going to finish the basement initially, so it was just the foundation, walls and some electrical/plumbing. We thought since they worked exclusively with these off site builds, they would be better equipped to build the foundation and coordinate with the house builder's specifications. Also, in theory, they are doing all the basement work while the main house is being built so they finish about the same time. Not so much. 


That relationship was tough. The sister company was hard to work with because they lacked communication. Sometimes I would hear nothing and see no one for weeks. As an example, the day of the house move, the house moving company had to get on the phone and very sternly talk with the head contractor to get him to our property, because the basement wasn’t ready. The house movers had to spend several hours moving dirt so the house could be moved up the hill...something that should have been done well in advance. I noticed after we closed that all the windows in our basement are the wrong color. I’m still missing a screen for a window because they brought me the wrong one. They put the stair railing into the drywall with anchors and it came out within a month. The construction site wasn’t kept clean, and I had to clean up cigarette butts and spilled spoiled milk when we moved in (yeah...not ideal on closing day). They did come and fix the railing within a couple of weeks. I didn’t bother pushing back on the windows because honestly I just wanted to be done with them. 

After we moved in and closed, we realized that building a home isn’t really done when you move in. We decided pretty quick the unfinished basement wasn’t going to work for us. So we hired an awesome general contractor to do that work (which is still ongoing). We also hired a landscaper to hopefully do something with the mud pit around the house. Five dogs and three kids do not do well with a dirt yard in the spring. Also, the bones of our house are pretty standard, so I'm wanting to add more custom touches here and there.

Feel free to message me any questions you may have. I would recommend the process especially if you are on a time crunch or need to stick to a budget. 

Share:

Friday, June 8, 2018

Electric and Water in a Vintage Camper

Hello!

This week's post is for all those people out there with a vintage camper, thinking of getting one or just curious how we deal with two of the main concerns/components of a vintage travel trailer: electricity and water.

When we got Myrtle, the water had already been removed (apart from the toilet...I guess. The previous owners said they had used it, but we never even tried that out.) The electrical was the original 1963 electrical and hook-ups and according to the previous owner "We didn't get it checked out, but it seemed to work fine."

Hmm. Does that make anyone else feel a bit uncomfortable? The walls had been recently replaced (including all the supporting wood) and the exterior resealed. So, the last thing I wanted to do was dig into the walls and replace electrical. Also, I know nothing about electrical. This would have been a project heavily supervised by my more handy relatives.

So, what to do? We did use the original wiring for 1 camping trip for a light. However, the previous owner had hardwired a window A/C unit in, and I can not imagine that the wiring system was designed to take on that kind of load.

After a couple of camping trips, I decided it was time to figure out a solution. The number one thing recommended to us as we started renovating our home was to wait renovate until we had lived in it for a few years. Its an excellent way to figure out exactly what your family wants and needs.

We do not use a refrigerator while camping. Our trips are just a couple of days, so a heavy duty cooler does the trick. (FYI: We also have a separate one for drinks which really helps keep the ice in the food cooler) We discovered through a couple of camping trips we only need electricity for: (1) lighting in the camper, (2) charging our phones occasionally, (3) a small single serving coffee maker,  and (4) *maybe* the A/C. However, to be honest if it's hot enough to use the A/C we generally aren't going to be camping with young kids.

Once we knew what we needed to the electricity for, it was pretty clear an extension cord would be enough power. (With a separate A/C power cord if we were going to run that). I created a solution from a problem. What I mean is, the previous owners took out all the original windows. (I have recently acquired some "new" original ones that will slowly make their way back into the camper). On the front windows they just covered up the area with insulation and sheet metal. While that's less than ideal aesthetic wise, it does make it much easier to create some sort of pass though for an electrical cord.

Using PVC pipe, a hole cutting drill bit, screws, butyl tape and glue, I created a way to pass through the extension cord into the camper without having to prop and window or door open. I have a threaded cap that goes over the opening when we're not camping or using it so there's no issues with bugs or mice getting in.


I hide a power strip and all the cords in a vintage luggage case when not in use. Also, in order to create a "switch" for the lights, I used a simple remote outlet on the overhead lights. The remote is attached to the wall with a command strip.


The second issue is water. We buy our drinking water in separate gallon jugs (and keep in the drinks cooler), but we still need water to clean dishes, wash hands and brush teeth. Our solution for this problem was the original sink (which will get a paint job in the future) with a bucket underneath and a 5 gallon water tank over the sink. I made a stand for the tank so it could hang over the middle of the sink.


We use biodegradable soap while camping so the waste water won't hurt the environment. The only complaint I have with this system is that it's a bit hard to wash large dishes in the small sink. I wish we had a tank that was less deep and was taller. (So, I'm on the hunt for one that fits that criteria). The 5 gallons lasts our family two full days with a bit left over.

It's not luxurious per se, but we're people that really just wanted something that was one step up from tent camping with a bit of style. I think Myrtle perfectly fits the bill. (And no grey water tanks to deal with!)


watermelon pinterest seagreen facebook blue twitter 1
Share:
Blogger Template Created by pipdig